7 minutes
Server Side Rendered HTML Using Phoenix Liveview
Server-side rendered HTML using Phoenix LiveView
 “LiveView” television
After attending the 2019 Lone Star Elixir conference in Austin, Texas and hearing the release of Phoenix LiveView announced, I decided I wanted to jump on the train of dabbling in LiveView. At the time, a lot of the examples being released were mini games which is what initially inspired me to recreate Minesweeper! After reading this you should understand what LiveView is, know some of the advantages and disadvantages of server side rendered HTML, and have an insight into how I used LiveView to build a clone of Minesweeper.
What is LiveView?
LiveView is a hex library for managing application state and delivering server rendered HTML. To understand the LiveView lifecycle, we’ll first take a look at the different templates used by a LiveView application.
There are 3 layouts (templates that render other templates) that are now in a Phoenix application:
-
the root layout,
root.html.eex— this is the layout shared between LiveView and regular templates; this is rendered only on the initial request for the application and then is used to render other templates -
the app layout,
app.html.eex— this is the default template in Phoenix that lives outside of the LiveView library (meaning that it’s irrelevant in a strictly LiveView application) -
the live layout,
live.html.leex— this is the LiveView template that has access to the state of the application and is updated as apart of the LiveView request life cycle
LiveView starts by rendering the root layout on the initial
request, and then establishes a connection with the client
through
Phoenix Channels. phx-
bindings
defined in the live template dictate when events are fired off
by the client, and then associated event handlers in the
LiveView file will make appropriate updates to the application
state. Anytime the state of the application is updated, LiveView
will retrigger the render function that contains
your live layout, index.html.leex and rerender the
page for the user. Meaning you got yourself stateful Elixir
rendered HTML.
Understanding LiveView for me really came down to these 3 files:
-
router.ex— where we assign our LiveView and define the root layout for our application.
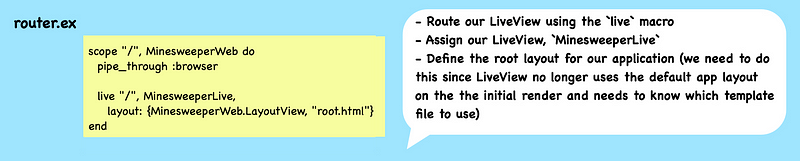
router.ex file
-
root.html.eex— our root layout. This is the view that will be rendered on the initial request of the application, create the client connection to the server via web sockets (this happens specifically in theapp.jsscript), and also where the embeded LiveView layout will be rendered later using the<%= @inner_content %>tag.
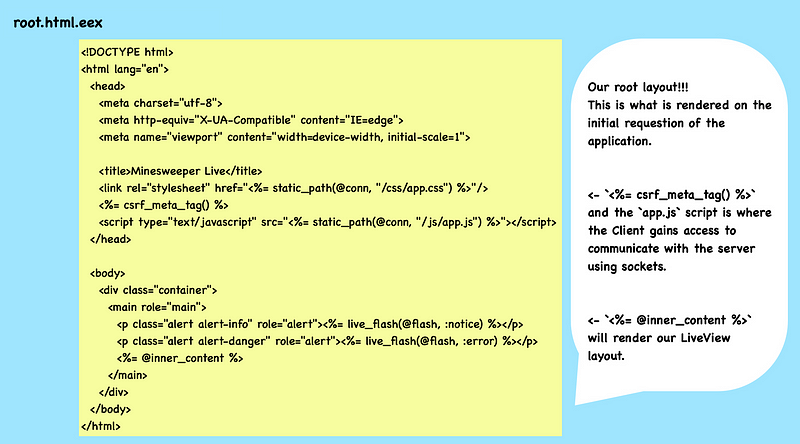
root.html.eex file
-
*_live.ex— the “LiveView”. This is where the state of the application is iterated on and where the LiveView layout,.leextemplate extension, gets rendered using therender/1function.render/1can return inline HTML or anindex.html.leexfile.
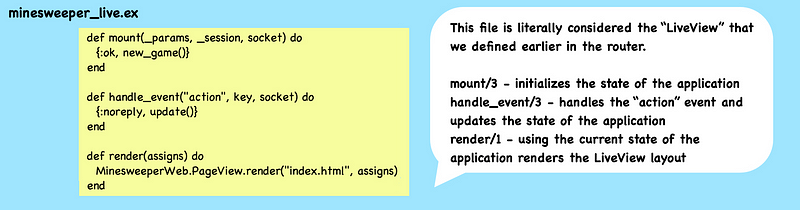
*_live.ex file
Recreating Minesweeper and implementing event handlers
(You can checkout and play my Minesweeper game here!)
The hardest part of writing my LiveView application had nothing to do with LiveView; it was figuring out the Minesweeper logic itself (let me know if you find any bugs!). All of the logic in some way involved implementing the event handlers to track the current state of the game and display it to the user.
In the *_live.ex file diagram above, I briefly
mentioned that the mount/3 function will initialize
the state of the application. The state in a LiveView is
stored in the socket as assigns.
Meaning that we can access a particular state key by using
socket.assigns.state_key (in the LiveView itself)
or by accessing it in the LiveView template with the notation
@state_key.
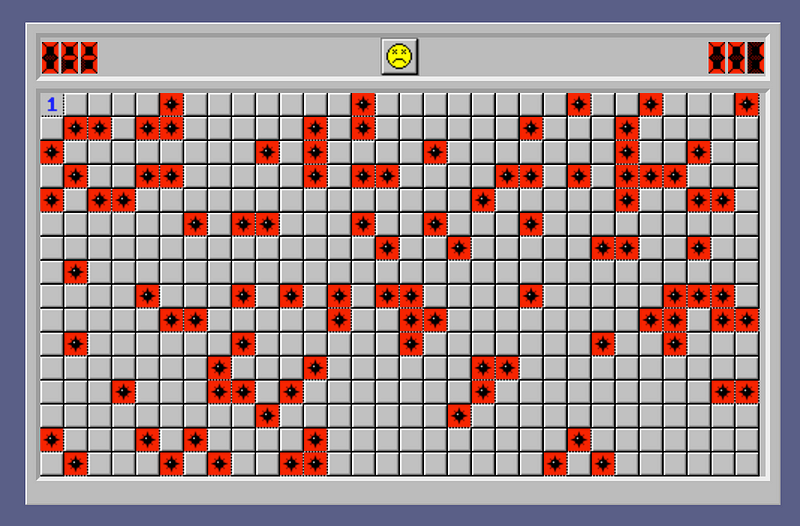 Minesweeper!
Let’s go through an example! A really simple feature is that
clicking the face on the board will start a new game. In order
to do this we need to add an event binding in our Live layout,
index.html.leex, that will listen to click events,
and also create the event handler in the LiveView,
minesweeper_live.ex file itself that will update
the state of our application to start the new game.
// index.html.leex, live layout file
<span phx-click="restart-game" class="status <%= @game_status %>"/>

// minesweeper_live.ex, the LiveView file
def handle_event("restart-game", _key, socket) do
   # randomly generate initial mines with random coordinates
   random_initial_x = Enum.random(1..@rows)
   random_initial_y = Enum.random(1..@columns)

   new_socket =
      socket
      |> new_game(random_initial_x, random_initial_y)

   {:noreply, new_socket}
end
To keep things simple, we can determine whether we’ve started a
new game by looking only at the @game_status socket
value. @game_status is one of the many state keys
that I implemented in my mount/3 function that were
initialized when the page was rendered. If the
@game_status value is “dead”, meaning the user has
lost the game, then we will see the frowny face. When the user
starts a new game, the value should get updated to “alive” and
the face should return to a happy face.
Using
bindings
we can do this really easily. LiveView uses the
phx-click binding to listen to click events and
send them to the server. In my LiveView layout, I define the
phx-click="restart-game" binding on the
<span> wrapping the face, so that when the
user clicks the face an event is fired. Then, in my LiveView
file there is an equivalent event handler,
handle_event("restart-game") that will
receive the event and start a new game!
Whenever we’re initializing or updating the state of our
application we always return the socket with our new state
attributes using the assign/2 and
assign/3 function helpers. The assign function
helpers take in the existing socket and a list of key/value
state attributes and return the updated socket. So in the above
code snippet, new_game/3 is actually just a
function that returns the output of the
assign/3 function with the new state attributes
like this:
defp new_game(socket, _, _) do
   assign(socket,
      game_status: "alive",
      ...
   )
end
And just like that, we’ve created a click event handler that will start a new game!
Advantages and Disadvantages
Let’s start off by saying LiveView is super fast. Not only because of the persistent client connection but LiveView also uses DOM-diffing. When the state is updated and the page is rerendered, LiveView uses DOM-diffing to update the page. This prevents the entire page from being rerendered and instead only the parts of the DOM that have been updated.
LiveView is also nice when you don’t want to have to manage both the client and the server. By no means is LiveView a replacement for Javascript frameworks that offer more complex interfaces, however there are instances where you want to enable real-time user interaction without the large overhead of a framework. This gives Elixir developers the option to create interactive applications without having to write or manage any Javascript.
Ironically, LiveView’s best use cases are usually not games. In fact, LiveView is a little unnecessary in these cases because we’re making server requests when we might not need to. In my Minesweeper example, I could have written this just as a simple Javascript application with no concept of a backend. LiveView would have been more useful in this instance if I had created score keeping. This would have allowed me to update scores in real time for users. As Chris McCord said, LiveView’s best uses cases can be seen in
simple real-time updates, client-side style validations with immediate feedback, [and] autocomplete inputs
Lastly, LiveView has no offline capacity and could be a lot of demand on your host provider. Remember, every instance of your application will be creating a unique connection from the client which after many connections can either cause your application to lag or end up just costing you money from your provider.
There are a lot of helpful step by step tutorials on how to get your first LiveView application up and running. Most of the work will be making your own unique application by updating the LiveView template to create the view you want and implementing the event handlers that will update your state.
LiveView is still under active development and so unfortunately
some guides are already becoming outdated. The best way to keep
up to date is to follow the
changelogs. There’s already hype (mostly me) around the new command,
mix phx.new --live, which will allow users to
quickly initialize a LiveView application. Hopefully as more
updates come out this makes starting your own LiveView project
even easier.
I hope you’re all staying safe during these hard times! Let me know if you have any feedback in the comments below! I read a lot of other great articles that helped solidify my understanding of LiveView and am really grateful Elixir has such an amazing community to learn. As always, you can follow me on Medium and Github to see what else I’m working on and thanks for reading. 😊
1441 Words
2020-04-20 12:00 -0500